
Here I'm going to talk you through the steps in gyotaku, which is Japanese for 'fish printing'. It goes back to around the mid 1800's, in Japan as a way for fishermen to record their catch, however as time went on, and cameras came into existence, it became an art form.
So below are the steps I use after trial and error- Please bare in mind this is the way I've found to work, I don't know if there is an 'official way' but this works for me.
Ingredients:
A fresh fish (try not to get a particularly oily fish)
A board/surface to lay the fish on
Foam brushes (varying sizes)
Kitchen roll/cloth (to remove stray ink)
Ink (I use Japanese sumi ink)
Paper (I use Japanese rice paper)
Polystyrene and pins (to position the fins)
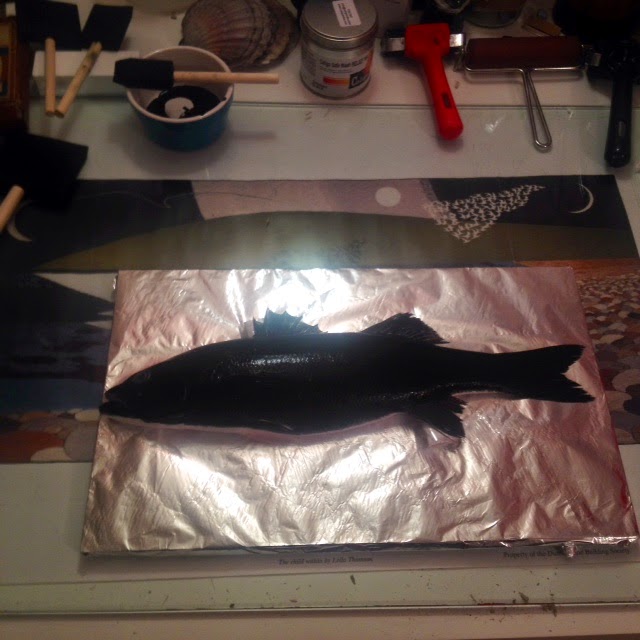
For this print I have used a sea bass that was caught this morning...

Note: don't buy a fish that has been gutted or has been cut/bruised in any way. It will be far too difficult to print due to 'leakages'.
Once you get it home, you need to give it a good clean under the tap to wash off the slime on the fish. A bit nasty to start with but you get used to it.
After you have cleaned (and gently dried) the fish it's time to position it onto a board/bench, anywhere you are going to use. I prefer to put tin foil under mine just to make the cleaning process a lot easier.

Next I position the fins. It would be a shame to print the fish without taking full advantage of its beautiful fins. I use polystyrene and really fine pins to hold the fins out.

Thirdly it's time to start applying to ink. I use Japanese Sumi ink which can be bought from various websites. It took me a while to find suitable ink, some claims to be waterproof when dried, however don't always believe them!

Next I lie rice paper over the top of my inked fish. I use Japanese rice paper for this. (It isn't actually made of rice, it's simply something westerners called the paper a long time ago and it sort of stuck) if you do a search for rice paper, you will get what you need- there are many different kinds of rice paper, some thicker than others...this is where trial and error comes in and you just have to see what suits you.
I use a foam brush and my fingers to smooth the paper over the fish. This bit can be quite time consuming and fiddly. It just takes patience and practice. Try not to move the paper around too much or you'll end up with a double print or blurred edges.

So, once you have fully smoothed the paper over the fish it will look something like this. You can see where I have left the eye - if you do paint over the eye the ink will mix with the moisture from the eye and you will just end up with a large black blob that will bleed over the paper.
Some people remove the eye altogether and super glue it up (as well as superglue all other orifices. However I'm not into that.
If you use a nice fresh fish that hasn't been bruised in any way and wash and dry it properly you shouldn't experience any problems with 'leakages'.

The moment of truth!! Peel back the paper from the fish and simply hope for the best (it's just that scientific)...there's nothing you can do by this point if it doesn't come out OK I'm afraid, so if it doesn't work, just consider it a valuable test print!

Almost there...ideally your print will now look something like this, with a nice white circle where the eye should be.

Lastly I paint in the eye using the same ink and a fountain pen. I find it get's the best 'look' from the fish. I don't like to leave it white as I think it looks a bit creepy, but that's just my personal opinion.
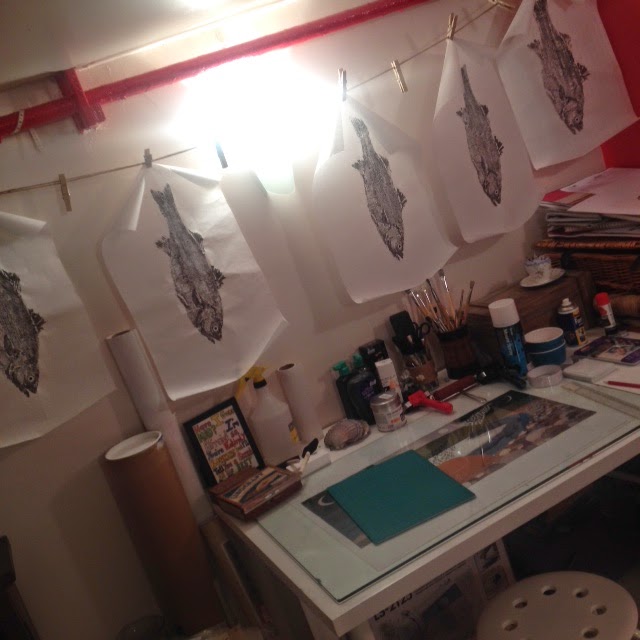
Very last job is to hang them up to dry. No matter how much practise you get in, there will always be prints you wish to discard due to imperfections. I got around 14 prints from this fish, but only found five of them good enough.
I have found the amount of prints you get depends on the kind of fish. A fish with less obvious scales and more delicate skin will not last many prints.

And there you have it! Once dry you have your finished piece of gyotaku.
It is a very time consuming art, I spent many hours today working on these prints, and the hard part isn't even over yet, now I need to mount these five prints...which believe me, is a lot harder than it sounds. It may also mean that I lose one or two of them due to the mounting process.
Some gyotaku artists don't mount their work. They simply frame it, however due to the makeup of the paper the area with the ink shrinks, so you end up with a lot of wrinkles.
So if you come up with a simple and effective way to mount these, then please get in touch!!
This is a fascinating post! Your results are beautiful!
ReplyDeleteThank you for your comment. I started off using flat detailed shells to start understanding the process. It doesn't seem to work for every fish though, I tried using mackerel a few weeks ago and due to the oiliness of the fish no matter how long I washed it for, it didn't print properly. I'm constantly learning!
ReplyDeleteThank you for your kind words, it's much appreciated!